3 Shape Up Tactics Every Product Team Should Use
Here are three tactics to keep your teams focused on the most important aspect of product development: the relationship between problem and solution.

I try to steer clear of dogma. That's why I don't subscribe to any one method of developing products. Scrum, Lean, FDD, Kanban, Scrumban, XP, Spiral, etc. - they all have their strengths and weaknesses (yes, even Waterfall). There is no right way of organizing and developing product.
I believe in learning many methodologies, trying out different ideas, and creating systems that work for the products I'm building and the teams I'm building them with.
Shape Up is a product development methodology that I think is well suited for this type of customization. Although it was developed at Basecamp - a company known for its dogmatic ways of working - most of the strategies they share in the book are malleable and portable.
At its core, Shape Up is really just a set of tactics designed to help teams focus on the most important aspect of product development: the relationship between problem and solution. So, in this post, I'm going to share three tools I find incredibly useful from Shape Up that any team can use.
1. Breadboarding
Ideas are fickle. As they sit in our heads, we change, morph, and adapt them with each new conversation, requirement, and piece of feedback. And this can sometimes lead us to lose the core concept of our solution. Soon we start asking things like, "Wait, how does this all fit together again?"
Breadboarding is a great way of externalizing our ideas and protecting them from the swirling tornado of new information that exists in the concept phase.
I think of breadboarding as a tool that sits at the intersection of storyboarding, wire-framing, and concept mapping. Where each of the latter focuses on providing different levels of fidelity on look, feel, and flow - breadboarding focuses attention solely on how a product works.
Let's take a look at a simple example:

Here you can see the three main pieces of breadboard diagrams:
- Places - elements that display information to users.
- Affordances - elements users interact with.
- Lines - connections between affordances and places.
Thinking about each element in a concept as one of these three patterns seems so simple that you might think it's only useful for trivial examples like the one above. But this process scales really well. You can outline the elements of an entire product with just a breadboard diagram.
The balance between action-based and visual-based design makes it great for guiding collaboration and garnering buy-in across engineering and UI teams. It's easy to find flaws, iterate quickly, and keep fleshing things out over time. And the incorporation of only high-level details ensures the forest isn't lost in the trees.
And when it's time to get a little more visual, it's easy to turn those Places into...
2. Fat Marker Sketches
When prototyping new features or products, it's really important to match the level of visual fidelity to the level of understanding about the actual UX. If we don't know where the "Submit" button goes yet, we shouldn't distract ourselves, our teams, or our potential users with its color or copy. Our mockups and prototypes should operate like good scientific experiments - testing one variable at a time.
Fat marker sketches are a great tool for doing this. They're incredibly fast to create, iterate, and throw out if need be. They're also a great way for managers, engineers, and other non-designers to provide visual concepts to the design team without locking in a certain "look" or strict flow.

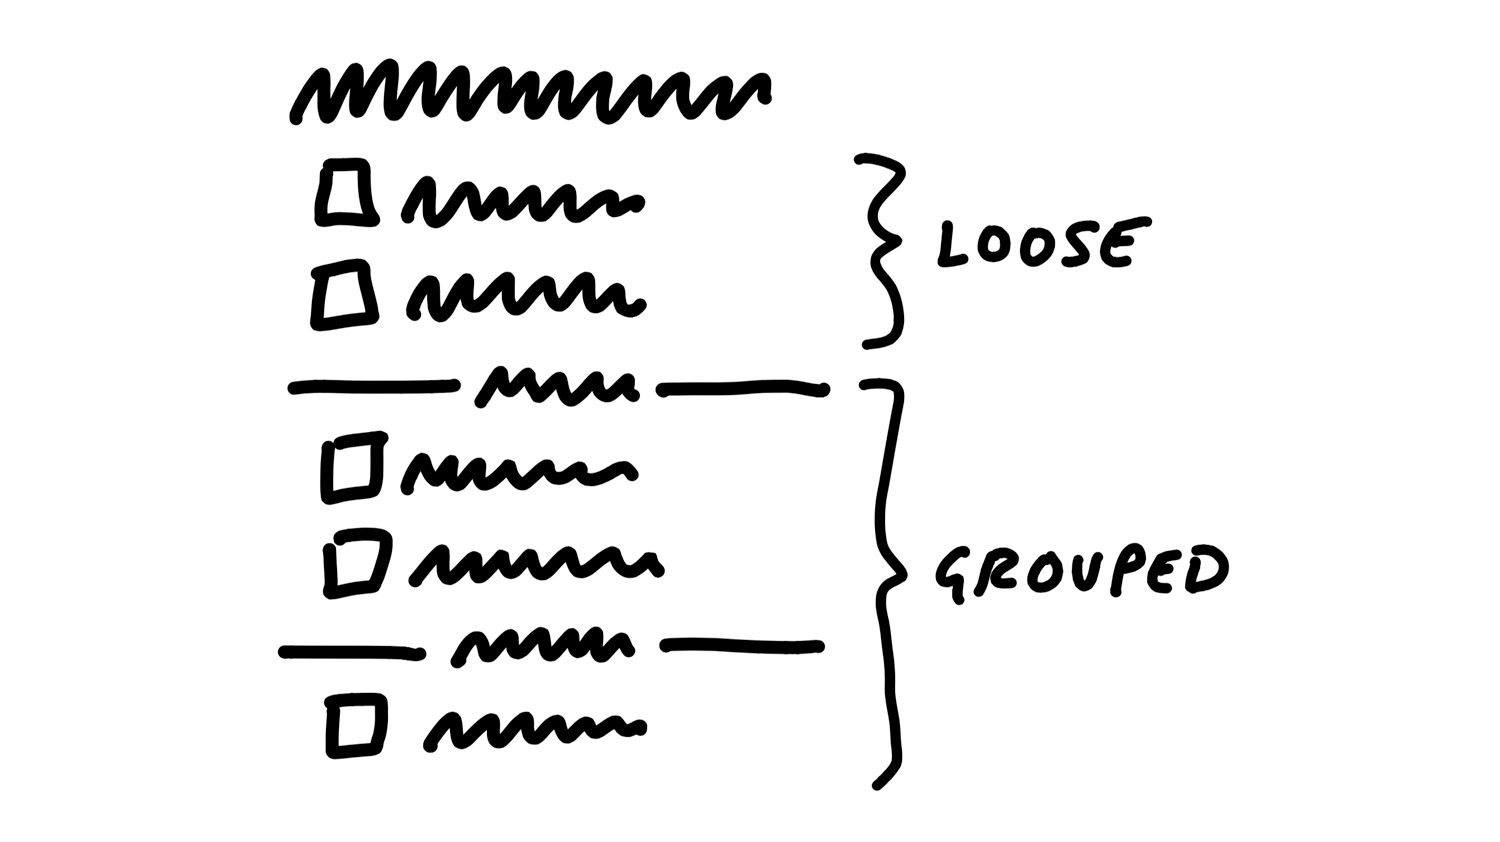
Notice how the sketch above for a simple todo-list grouping system conveys the key visual elements and omits everything else. There's no copy, color, or concept of space (like a page) or time (like a flow). This means the team can have a clear discussion internally or garner feedback from users about the key piece of visual language in question - the dividers - without distraction.
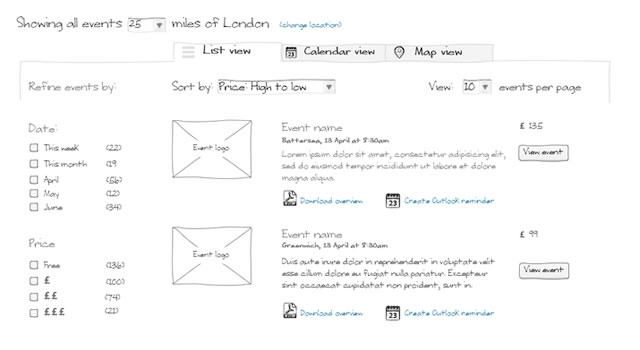
Once that piece has been solved, the design team can iterate again and test out another assumption. This process can continue piece by piece until the sketch starts looking more like a full visual prototype.

The sketched look still communicates that this is a "Work In Progress", but the important stuff - the UX - is all there.
Note that it's not enough to just design in grayscale with a tool like Figma. I love Figma, but it makes it too easy to be too precise too soon. That's why for both Breadboarding and Fat Marker Sketches, I recommend using a tool like Excalidraw.
3. The Pitch
I believe one of the biggest liabilities to product teams is a bias towards building. Two years ago, I would've disagreed with that and continued focusing on "failing fast". But now, I'm much more interested in failing smart and leading teams with a bias towards learning.
Part of that is adding a risk mitigation gate between ideation and execution. Crossing the gate means the idea's implementation strategy has been rigorously researched, vetted by the technical team, and the scope of work has been strictly defined.
Working this way ensures solutions are well thought out and tested before anyone writes code. Because building the wrong thing is actually sometimes worse than building nothing. The tool I've found to be the best proxy for this metaphorical gate is the Pitch document.
A Pitch is essentially just a Shape Up flavored design doc. However, what I like about the Pitch is that it goes beyond prompting the traditional, baseline conversation around problem/solution. There are three sections I find most powerful, but you can find the full template here.
🍜 Appetite - Fixed Time. Variable Scope.
When building products, time is often our greatest enemy. We try to make estimates or use convoluted proxy systems, but at the end of the day: we have no idea how long it will take to build something we've never built before.
In essence, we structure our projects with a fixed scope and variable time. What the Appetite section of the pitch asks us to do is think about our projects the opposite way - with fixed time and variable scope.
Instead of asking, "How long is this gonna take?" - we ask, "How much time are we willing to spend solving this problem?" Answering that question is just another business calculation:
- How much is it costing us to not solve the problem?
- What's the return on investment?
- What's the opportunity cost of working on this instead of something else?
These are much more answerable questions. And once we can confidently say, "we're going to spend (6 weeks | 2 months | a year) solving this problem", we can start hammering the scope. That means asking,
What's the version of this solution that we can build in the given amount of time and still solve the problem?
Time is a phenomenal creative constraint. Using it this way prevents runaway projects and scope creep. It also requires us to deeply analyze our solution and find the gaps in our knowledge or thinking so that we can confidently hit the deadline.
Speaking of which - let's talk about...
🐰 Rabbit Holes - Potential Pitfalls
All too often, just as we're hitting a stride and gaining momentum with the team, we hit some unforeseen obstacle.
Now, sometimes that obstacle was actually hidden. We are never operating with perfect information. However, other times that obstacle was in plain sight, but was overlooked. Finding Rabbit Holes is about taking the time to survey the land and call out the latter early.
This usually involves asking ourselves and our teams a ton of implementation questions like:
- Does this require our technical team to learn something new?
- Are there any major decisions management needs to sign off on that would block the team?
- Have we tested our assumptions enough?
A good way to brainstorm possible rabbit holes is to imagine what someone would put as a Blocker in their daily standup. How can you mitigate that blocker before it happens?
Investing the time up front to discover and work around these problems will almost always pay off on the back end. The same can be said for establishing...
🛑 No Gos - Out of Bounds
Maintaining a technical team's focus during a long project is one of the hardest things to do. Great designers and engineers are perfectionists. If given the opportunity, they'd sit and polish each piece until it was spotless. But with a fixed deadline for every project, we don't have that luxury.
So, in order to keep everyone on track, maintain momentum, and limit distractions - it's important to establish what the solution is, and what it isn't. By doing this, it sets the tone for the team that they are encouraged and empowered to say no (or not yet).
These No Gos are also great for calling out future improvements to the solution that can be pitched in the future. This makes sure ideas that were cut for time aren't forgotten. This also creates clarity across customer support, management, and quality control of what is and isn't being shipped on day one. This protects the engineering team from being stalled by disagreements about the requirements of a project halfway through its development.
That's it for now.
As you can tell, I love these tools. But this post is getting absurdly long 😆.
I hope it's given you some ideas you can incorporate into your product engineering teams. If it has or you have other thoughts you want to share, please reach out to me on Twitter. I'd love to hear from you.
Until next time.
Quick note: This post discusses the concepts I like using from the product development methodology described in Shape Up. It does not mean that I condone the idiotic beliefs and behaviors of the Basecamp founders or the author, Ryan Singer. I wrote about my thoughts on that situation here.
